Wednesday, September 30, 2009

Giant Pumpkin

Until October 17th, I will not stop thinking about Madison's birthday party. Yesterday, I remembered a large piece of cardboard that I had in the garage. I gathered a box cutter, paint (orange, green, and brown), rafia, and my hot glue gun. I cut out the body of the pumpkin and the stem separately to give it a little bit of dimension. I painted the pieces and hot glued the stem to the pumpkin. Then, I hot glued a mess of rafia at the base of the stem. I am going to use this giant pumpkin to decorate the "pumpkin patch" at her party.


Monday, September 28, 2009

Snickerdoodle Bars

Today I saw this recipe on the Cookies and Cups blog. She had gotten the recipe for Snickerdoodle Bars on the blog called 3B's...Baseball, Baking, & Books. Did you follow that? What a simple, quick treat. I love a recipe that calls for ingredients that I always have in the pantry. That means I can make a batch any time I want....which will probably be often. They are so good. I have always been a fan of Snickerdoodle cookies so I really enjoyed these. My daughter also enjoyed helping Mommy in the kitchen. She stirred the batter and washed dishes! (I could get used to that.) Let me know if you try them. I hope you like them as much as we do!


Friday, September 25, 2009

Ssssssshhh......For parents' eyes only

I found a Christmas elf! My daughter, Madison, is about to turn two. I am so excited to begin the tradition of the Christmas elf in our house. (If you haven't heard of this tradition...ask me. I would be glad to tell you what I know.) I have been looking everywhere for an adorable elf that wasn't too pricey. Well, I FOUND ONE TODAY! I went to Kirkland's in hopes to find some shades for a chandelier. (FYI: They said that they don't sell those anymore.) What did my eyes see.... an ELF! It was only $5.99. THAT IS AWESOME! So, of course, I immediately got on the phone. I called my best friend Kelli and my sister-in-law, Elizabeth. This is the question though.....do you have one elf per family or one elf per child??? I only have one child now, but I plan to have another in the near future. I went ahead and bought two for myself. That way I can decide later. If I decide to have 1 for the family, the other will be a back-up elf in case the 1st elf gets ragged. Another question....are the kids allowed to touch the elf? I have heard yes from some people and no from others. What is your tradition? I took some pics so you could see them for yourself. I took one with my hand so you could tell the size. They even have the beans in their bottoms so they can easily sit up.

Posted by Picasa

One Man's Trash is Another Woman's Treasure

My new project....

I am not too ashamed to take something from my neighbor's trash pile, as I did this morning. So, thank you, neighbor! (Please don't ask for this back after I make it really cute!) I am trying to decide what to do with this before I begin. I think I am going to use it as a folding table in my laundry room, but it could also go in my sewing nook. Hmmmmm....the possibilities! I might paint it black...or red...or turquoise. Any suggestions? Any advice on how to restore the top? It is warped from water damage. I will be sure to post a pic when I am finished. I am in the process of planning my daughter's 2nd birthday party....so, this project may have to wait about 3-4 weeks. I am anxious to see it dolled up!

Show Us Your Life-Desserts

New York Style Cheesecake


Crust:

  • 1 ¾ cup graham cracker crumbs
  • ¾ cup sugar
  • 4 TBSP melted butter


Mix and reserve 1/2 cup for topping. Spray or line the spring form pan with parchment paper. Press into springform pan.


Filling:

  • 3- 8 oz. blocks of cream cheese, softened
  • 16 oz. sour cream
  • 1 TBSP vanilla
  • 1 cup sugar
  • 5 eggs, separated
  • 1 TBSP cornstarch
  • 1 TBSP flour


Mix cream cheese and sour cream in mixer. Beat egg yolks and add them to the mixture. Add sugar, flour, cornstarch, and vanilla.


Beat egg whites with a mixer for 2-3 minutes. They should be frothy and start to thicken. FOLD egg whites into mixture. Pour into pan. Top with the remaining crust mixture.


Bake at 325° for 1 hour. Turn off oven, open door, leave for several hours or overnight. OR remove from oven after cooking and allow it to cool on counter. Cover with foil and put in fridge to cool.


This makes the BEST cheesecake ever!!!!!!!!!!!! I got the recipe from my Mom-who has made a lot of these. The recipe was passed to her from another friend. You MUST try this cheesecake. Don't be intimidated!


Tuesday, September 22, 2009

Pumpkin Bars

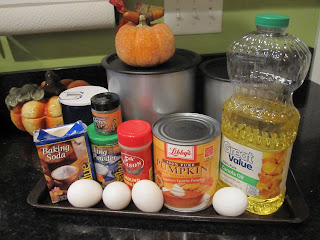
Because it is the 1st day of Fall, I am making Pumpkin Bars, Taco Soup, and cornbread today. I LOVE FALL! I just wish the weather was a little cooler in the southern end of Alabama. Oh, well. It will be soon enough. This recipe for Pumpkin Bars comes from my Better Homes and Gardens cookbook. The bars are more cake like than what I typically think of for "bars." They are topped with a cream cheese icing. I love anything with cream cheese!

Pumpkin Bars

2 cups all-purpose flour
1 1/2 cups sugr
2 tsp baking powder
2 tsp ground cinnamon
1 tsp baking soda
1/4 tsp salt
1/4 tsp ground cloves
4 beaten eggs
1 16 oz can pumpkin
1 cup cooking oil
Cream Cheese Frosting (recipe follows)

1. In a large mixing bowl stir together the flour, sugar, baking powder, cinnamon, baking soda, salt, and cloves. Stir in the eggs, pumpkin, and oil till combined. Spread batter in an ungreased 15x10x1 baking pan.
2. Bake in a 350° oven 25-30 minutes or till a wooden toothpick inserted near the center comes out clean. Cool for 2 hours on a wire rack. Spread with Cream Cheese Frosting. Cut into bars.


Cream Cheese Frosting

3 oz cream cheese, softened
1/4 cup buter, softened (1/2 stick)
1 tsp vanilla
2 1/4 cup powdered sugar, sifted

1. Beat together cream cheese, butter, and vanilla until light and fluffy.
2. Gradually add 2 1/4 cup powdered sugar, beating well. Should reach a spreading consistency.


Monday, September 21, 2009

Apple Praline Bread

My best friend, Kelli, made a delicious treat today.... APPLE PRALINE BREAD! Double yum! She is bringing me a taste tomorrow. I am so excited! She found the recipe in a recent copy of Southern Living magazine. Here are the pics and the recipe. Get ready to drool.

Praline Apple Bread

1 1/2 cups chopped pecans, divided
1 (8oz) container sour cream
1 c. granulated sugar
2 large eggs
1TBSP vanilla extract
2 c. all purpose flour
2 tsp. baking powder
1/2 tsp. baking soda
1/2 tsp. salt
1 1/2 c. finely copped, peeled Granny Smith apples (about 3/4 lb)
1/2 c. butter
1/2 c. firmly packed light brown sugar

1. Preheat oven to 350°. Bake 1/2 cup pecans in a single layer in a shallow pan 6 to 8 minutes or until toasted and fragrant, stirring after 4 minutes.
2. Beat sour cream and next 3 ingredients at low speed with an electric mixer 2 minutes or until blended.
3. Stir together flour and next 3 ingredients. Add to sour cream mixture, beating just until blended. Stir in apples and 1/2 cup toasted pecans. Spoon batter in to a greased and floured 9x5 inch loaf pan. Sprinkle with remaining 1 cup chopped pecans; lightly press pecans into batter.
4. Bake at 350° for 1 hour to 1 hour and 5 minutes or until a wooden pick inserted into center comes out clean, shielding with aluminum foil after 50 minutes to prevent excessive browning. Cool in pan on wire rack 10 minutes; remove from pan to wire rack.
5. Bring butter and brown sugar to a boil in a 1 qt. heavy saucepan over medium heat, stirring constantly; boil 1 minute. Remove from heat, and spoon over top of bread; let cool completely (about 1 hour).
NOTE: To freeze, cool bread completely; wrap in plastic wrap, then in aluminum foil. Freeze up to 3 months. Thaw at room temperature.


Applique


I have wanted to applique for soooooo long now. I tried it in the spring, but I did not do a good job at all. After gathering a few tips, I decided to try again. This is a t-shirt for my little girl. I know that my work is not great yet, but it is much better than my first attempts. I am proud of it, and I know that with practice it will get better. I just wish that I had remembered some tips a friend had given me before I was halfway through my design last night. :) I was getting really frustrated before I remembered to decrease the pressure from the presser foot. I did an applique on a t-shirt. Does anyone have any more tips? It kept getting caught on the under side. I became reacquainted with my seam ripper last night.

1. Materials: Heat N Bond, 2 fabrics, matching thread, shirt, letter or design to trace, scissors, and iron. Also, not pictured: stabilizer, spray-on adhesive

2. Trace your designs on the paper side of the Heat N Bond


3. Iron the Heat N Bond that has the M on it to the fabric (wrong side of the fabric) for the M. Then, cut out the M. Iron the Heat N Bond that has the circle on it to the fabric (wrong side of the fabric) for the circle. Then, cut out the M and the circle. Remove the paper from the M and iron the M to the center on the right side of the circle. Leave the paper on the wrong side of the circle.

4. ZigZag stitch around the M.


5. Remove paper from the back of the circle. Iron this to the shirt.


6. I added stabilizer to the wrong side of the t-shirt directly under the design. I used a spray on adhesive to keep the stabilizer in place. Now, you are ready to sew around the circle.


Not perfect but a good attempt. I will definitely try it again!

Cazra

Saturday, September 19, 2009

Birthday Banner

My little girl will turn 2 on October 18th! I have been making preparations for her 2nd birthday party. Today I made a birthday banner. I got the idea from some other blogs I read last week. I plan to make another banner soon! My husband told me it would be a lot easier to just buy one....this is true, BUT I enjoy things like this! He did go on to say that I couldn't buy a banner that would be as cute. Ok, maybe he didn't use the word "cute", but his point was the same. :)


Friday, September 18, 2009

Target Finds

I went to our local super Target yesterday and found some great deals. I just wanted to make sure everyone knew about them. If I were still a teacher, I would have been in hog heaven! They have packs of 10 spiral notebooks for 15¢. That makes each notebook only 1.5 pennies!!! WHAT! That is a great deal!!! So, of course, I bought like 5 packs. I am not really sure why I need 50 spiral notebooks, but I couldn't pass that up. Madison might enjoy drawing in them. They have packs of large manilla drawing paper for 74¢. Small packs for 48¢. Fiskars scissors for 38¢. Protractors for 37¢. Wooden rulers for 12¢ (I use rulers all the time.) Happy shopping!

Thursday, September 17, 2009

Show Us Your Life-Dinner Recipes

This is a dish that I cook a lot, because it is soooo simple!

Sawdust Chicken

Boneless skinless chicken breasts (as many as you need)
Saltine Crackers
Butter
Seasoning Salt

Preheat oven to 350.

1. Pound out the chicken breasts. If the breasts gets too large, I cut them into 2 pieces.
2. Melt a stick of butter in one bowl. Crush the saltine crackers in another bowl.
3. Dip the chicken in the butter. Roll it in the cracker pieces.
4. Place the chicken on a greased baking sheet. Sprinkle the remaining cracker bits around the chicken. Drizzle the remaining butter all over. Season with seasoning salt.
5. Bake at 350 for 30 minutes.

I usually serve this with mashed potatoes and steamed broccoli.

Tomato and Basil Bruschetta

Let me start by saying, "YUM!". I have been wanting to make bruschetta since I watched Julie and her husband stuff their faces with it on Julie & Julia. I am trying to remember how she toasted her bread...I know she did it on the stove, but was it with butter or EVOO...not sure, but it looked great! Here is the recipe I followed:

Tomato and Basil Bruschetta

6 or 7 ripe plum tomatoes (I used roma, because Walmart didn't have plum)
2-3 cloves garlic, minced
1 Tbsp extra virgin olive oil and 1/4 cup EVOO
1 Tbsp balsamic vinegar
8 FRESH basil leaves, chopped
Salt and freshly ground pepper to taste
1 baguette French bread

1. Parboil the tomatoes: Bring water to a boil, remove pot from burner, add tomatoes, and let them sit for 1 minute. Remove the skins of the tomatoes. Cut them in half and remove the seeds, juice, and stem area.
2. Move a rack to the top in your oven. Preheat to 450
3. While the oven is heating, chop the tomatoes. Put the tomatoes, minced garlic, 1 Tbsp evoo, and vinegar in a bowl and mix. Add the basil, salt, and pepper.
4. Slice the bread on a diagonal (about 1/2 inch thick). Coat one side of each slice with evoo using a pastry brush. Place on a baking sheet, oil side down. Toast them on the top rack for about 5-6 minutes, until the bread just begins to turn golden brown.
5. Spoon the tomato mixture on the oil side of the bread. Add a touch of S & P (if desired)
6. Enjoy!

Makes 24 small slices.


I plan to use the remaining bread this weekend in Baked French Toast with Praline Topping. Check back for the recipe and pics!


Tuesday, September 15, 2009

Felt Pumpkin Bag

I am in the mood for fall! Today I made a felt pumpkin bag for my little girl. It is really simple. The most time consuming part was the blanket stitch that I did around all of the edges. (If you don't know how to do a blanket stitch, there are great videos on YouTube.) To do this project you need the following materials:

2 - 8 1/2 x 11 sheets of orange felt
1 - 8 1/2 x 11 sheet of green felt
Green and orange thread (I used cross stitch thread.)
Needle
Pattern


I am in the mood for fall! Today I made a felt pumpkin bag for my little girl. It is really simple. The most time consuming part was the blanket stitch that I did around all of the edges. (If you don't know how to do a blanket stitch, there are great videos on YouTube.) To do this project you need the following materials:
2 - 8 1/2 x 11 sheets of orange felt
1 - 8 1/2 x 11 sheet of green felt
Green and orange thread
Needle
Pattern